
How to Use RankIQ: #1 SEO Tool for Blog Traffic Growth


Last week, I published my review of RankIQ, a fantastic SEO tool for bloggers.
Today, I will show you how to use RankIQ for big traffic gains, and let you in on my exact process!
RankIQ is a Search Engine Optimization tool powered by artificial intelligence. It helps bloggers rank their posts on the first page of Google and increase their blog traffic without digging too deep into the world of SEO.
While I would still advise any new blogger to learn the basic principles of Search Engine Optimization – because no software will ever replace knowledge – working with good tools helps in many ways.
What I love most about RankIQ is that it’s easy to use (even for complete newbies) and it speeds up the content creation process!
I genuinely believe that beginners and advanced bloggers can benefit from the software to boost their rankings on search engines and increase page views quickly.

This post contains affiliate links, and I may earn a commission (at no extra cost to you) if you make a purchase after clicking one of those. I only recommend resources I use and love! Read my full disclosure.
RankIQ Tutorial: how to use RankIQ to rank high in search and grow your blog’s traffic!
RankIQ offers plenty of video tutorials within the platform. And, to get a feel for what it does, you can watch this short video directly on the homepage.
Brandon Gaille has put together a collection of resources already, and those are excellent! So in this post, we’ll start with a quick overview of RankIQ’s main features, and I’ll then show you how I use it myself, daily.
RankIQ’s Tools
After you’ve subscribed to become a member of the RankIQ family, you’ll have instant access to everything you need to start writing new, SEO-powered blog posts, or work on your existing blog posts.
For this exercise, I’ll assume you’re starting with new posts and walk you through the platform in the correct order.
Keyword Library
Head over to the Keyword Library by clicking the second page linked on the top navigation bar of your admin dashboard.
RankIQ’s keyword list is filled with thousands of low-competition keywords with high traffic potential. These have been extensively researched and hand-picked by Brandon’s team of SEO experts.
They add new terms to the library frequently and also remove existing phrases after a certain number of users have worked on them. This essentially means that the competition remains optimal and that you won’t run out of content ideas.

1. Finding your niche
The first step is to select your niche.
There are over 500 niches and sub-niches to choose from. The largest, have up to 100 sub-niches, and each one of them has been researched carefully.
If you’re a food blogger, for example, you’ll find well over 100,000 keywords to target!
As you scroll through the drop-down list of niches, you can pin the most relevant to you by clicking the orange button on the right-hand side of the menu. This will bookmark it on your account for easier navigation in the future.
2. Narrowing down the options
Once you complete the step above, inside the keyword research page, the list of ideas that is presented will only include your targeted results.
To avoid overwhelm, you can narrow it down further, using filters. Here’s how you can get even more specific:
- organize the list of keywords based on the level of competition, time to rank, or visits per year,
- type in specific words that you want to include or exclude from the list of suggestions, or
- search according to the type of blog post you intend to write (questions, comparisons, reviews, or “best of” posts).
3. Finding the right keywords
You now have your short list of keywords!
Before you start running reports, it’s important to understand what each column shows:
- Clicking the orange “plus” button adds the keyword phrase to your own list of keywords. This is the “My KWs” section of your dashboard, which I’ll write about next.
- After that, you’ll see RankIQ’s suggestion for the exact keyword phrase to use.
- The first metric on the right-hand side of the keyword table reads “competition”. It refers to how much competition there is for the phrase. Depending on your website’s DA, you can decide what to target first.
- Under “Visits/Yr” you’ll see the estimated amount of traffic your post could get if you optimize it to rank on the 1st page of Google.
- “Time to Rank” tells you how long it will take for your optimized content to rank well on Google. This ranges from “Long” to “Ultra Fast”.
- Upon clicking the green “Run Report” button, an AI-SEO report will be instantly generated for your chosen keyword phrase. I’d suggest holding on to that for now.
As you find ideas that you like, add them to your tailored keyword library by clicking the orange “+” button.
My KWs
In the “My Keywords” tab, you’ll see a cropped-down version of the Keywords Library. Here you’ll find your favorite keyword ideas as you’ve already selected them in the previous step.
It works the same way as the master keyword list, but only lists your top picks.
Once again, you can sort them in alphabetical order, by competition, number of visits per year, time to rank, or category. And by clicking the green button to the right, you can run an SEO report to find all the information you need for each phrase.
AI SEO Reports

Part 1: Essential Metrics
Once you click the “Run Report” button, RankIQ will start to analyze the top-ranking blog posts from other content creators.
When a new AI SEO report is generated, you’ll see the content targets you need to aim for, including the content optimization grade and word count, as well as a competitor analysis.
Part 2: Content Analysis
Below, there will be a list of terms that Google expects to see for your target keyword.
These are listed in order of importance so you can easily understand how to structure your article for the best chance of ranking high in the search results.
I like to have these under consideration when it’s time to plan my article’s outline.
But don’t worry about saving them, as you can always refer to the report again later. It’s saved on your account!
Also, the same keywords will be listed within the content optimizer, which we’re going to look at in a second.
Part 3: Title Analysis
This is one of my favorite features!
Of course there are loads of other headline analyzers and many of them are free. But since I use RankIQ, this is also where I come up with my titles.
This section of the report lists the words Google likes to see in blog post titles for your chosen keyword. With these at hand, it becomes super easy to come up with catchy, SEO-optimized titles for your posts.
As you draft it, the tool will give you a score and show the number of characters you’ve used, helping you avoid a title that is too long or too short.
Content Optimizer
The content optimizer is a great tool and, in my opinion, the highlight of RankIQ. It’s been a game-changer for me!
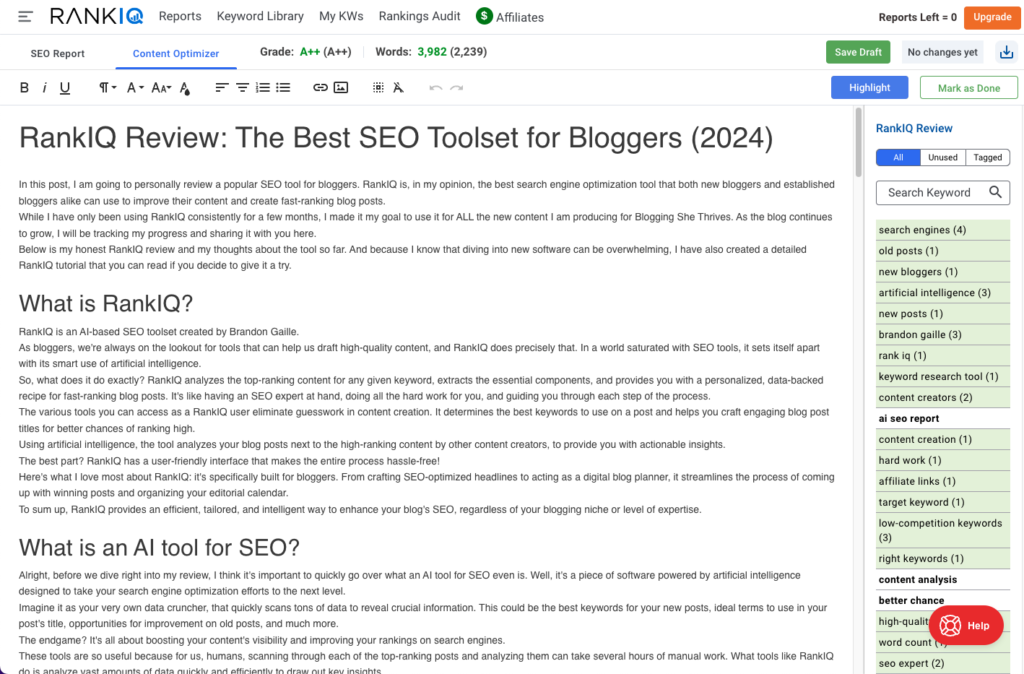
On the right-hand side of the screen, you’ll find a list of terms to use displayed in order of importance. These are LSI keywords (short for latent semantic indexing keywords) or semantic keywords, which are conceptually related terms that Google expects to find in articles for your chosen phrase.
For example, if you write an article about traveling to Portugal, the list of terms may include:
- Lisbon
- Algarve
- beach
- pastel de nata
- fado
- etc.
As you work on your article, the content optimizer grades your content from F to A++ and compares its length to the recommended word count.
Once you’ve achieved the recommended grade and word count, you are essentially done!
In no time, you’ll have created a top-notch title and written the most comprehensive piece of content for the keyword phrase you picked.
You’re all set to boost your blog’s organic traffic!
Rankings Audit
To use the Rankings Audit functionality, you need to have a Google Search Console account up and running.
Get into the “Rankings Audit” from inside your dashboard and connect your account to run your first audit. RankIQ will give you all the information you need in a matter of seconds!
This is a lot more detailed than what you’ll find on Google Search Console itself and delivered in an easy-to-understand format.
The analysis gives you:
- a searchable list of the keywords driving the most traffic to your website,
- a list of your website’s pages that are gaining traffic (“Pages experiencing traffic growth”), and
- a list of the pages that are losing traffic (“Pages experiencing traffic contraction”).
In his own words, here’s why Brandon Gaille recommends using this tool over other Google Search Console Apps:
- “We use the API, which gives you access to 5000 keywords vs. 1000 keywords
- Our tool is searchable by keyword
- You can quickly see rankings of any blog post
- We run multiple analyses and consolidate the most vital data onto a single page
- Almost every other SEO tool uses ranking estimates from scraping (GSC data is real)”
Content Planning & Blogging Goals
Another feature I love inside RankIQ is the goals and content planner section.
You’ll find these under the “Reports” tab, but I’ve decided to mention it separately because I do think it deserves to be highlighted!
It’s such a simple feature and yet SO important to bloggers. I love tracking my progress every month and seeing how I’m doing at any given time.
All you have to do is set your monthly content goals by telling RankIQ how many new posts you want to write each month and how many old posts you intend to update.
You’ll find a little graph displaying your progress just above the Content Planner.
This keeps me motivated to carry on! But you can also hide it if you find that it makes you feel more overwhelmed than motivated!
Right below these goal charts, there’s the Content Planner.
On the first tab, you’ll see your “Unused Reports”, which lists the keywords you’ve run reports for but haven’t written articles on yet.
And then, “Scheduled Posts”. This is where you’ll keep track of each of your post’s publishing date, status, overall grade, word count, URL, and to-do’s.


How I use RankIQ
Creating new blog posts
This SEO toolset is an invaluable resource for creating new content and boosting traffic fast!
RankIQ will help you find relevant keywords in any niche and optimize each piece of content the right way.
The good news is that it works well regardless of your level of expertise. Whether you’re a newbie, an experienced blogger, an SEO expert, or a complete beginner taking your first steps in the digital space, this is the right tool to use!
Here’s my step-by-step process for creating a new blog post with RankIQ:
1. I’ll search the keyword library for content ideas or bring in the keyword I want to write about (I often research on KeySearch too, so I frequently write on terms that aren’t listed by RankIQ).
2. Run a new AI SEO report for the seed keyword I’ve chosen.
3. Review the report to draft a general outline for my post.
4. Decide on the blog post’s title with the help of RankIQ’s title grader tool.
Some bloggers skip the outline planning altogether and prefer to write the title at the end.
Thhat’s ok too, you can always return to your report later.
I personally tend to tackle these first because I know I might get distracted. And this is the method I’ve found to help me stick to the topic I initially wanted to talk about.
5. Check out the top-ranking articles to see if they have anything I hadn’t considered.
I like to glance over those posts when structuring my own, but I avoid reading them so that I don’t risk accidentally copying their content.
6. Draft my entire blog post on a separate Google Doc.
7. Copy the text over to the Content Optimizer and edit it from there.
While I’m reviewing what I’ve written, I try to include any unused terms from the semantic keywords list on the right-hand side of the screen.
8. Once I’ve reached a grade and word count that I am happy with, I read the article again.
You could skip this step, but as a non-native English speaker, I tend to find opportunities for improvement every single time!
I also have the LanguageTool extension installed on my browser, which works perfectly right inside the content optimizer. So at this point, I take the opportunity to review my grammar and correct any mistakes it finds.
9. Copy the article to WordPress, add in the necessary graphics, and schedule the publishing date.
10. Update RankIQ’s content planner (under the reports tab), where I keep track of each post’s scheduled date, URL, and to-dos.
Updating old blog posts
If you have been blogging for a while but haven’t been using RankIQ, the tool will help you optimize old underperforming posts as well, and put them in a position to be top performers!
Ideally, you’d want to start by running a full website audit (using the Rankings Audit feature) and downloading a spreadsheet with a list of the pages that are losing traffic.
Then, you’d simply run an AI report for the main keyword you targeted for each of those posts, and follow the suggestions of the Content Optimizer to improve their overall grade.
Since you have already written the article in the past, all you need to do is make some improvements and fill in any content gaps based on RankIQ’s results.
This will help you rank for more long-tail keywords and improve your post’s position in search.
Here’s my step-by-step process for updating old blog posts with RankIQ:
1. Run a Ranking Audit to find the posts on my website that need improving.
2. Pick the ones that are getting some traffic but aren’t ranking well on Google.
Note: if a blog post isn’t getting any views at all, you might want to skip it, as it’s unlikely to bring significant traffic gains. Prioritize the ones that are doing ok but still have room for improvement.
3. Run a new AI SEO report for the seed keyword I was trying to go after.
4. Insert my current title in the title grader tool to see how it’s graded and whether it can be improved.
Note: if I need to change it completely, I often don’t!
I like to keep my titles and URLs similar, and I always use the exact match keyword in both.
Plus, I avoid creating redirects, so changing URLs is normally not an option for me. I guess it’s just my personal preference.
However, there are usually small tweaks that can be made to give these posts a better chance of getting clicks, without changing the URL!
5. Copy my entire blog post into RankIQ’s optimizer and check its current content grade.
6. Update it as needed using the recommended LSI words.
If entire paragraphs need to be added in order to include the suggested topics, I try to add those towards the bottom of the post, if I can.
7. Once I’ve reached a grade and word count that I am happy with, I read the article again.
This gives me an opportunity to check for any grammatical mistakes using the LanguageTool Chrome extension. It works perfectly inside RankIQ and it’s my best friend!
9. Copy the entire article back into WordPress!
Good to know: RankIQ keeps all the formatting, including H tags, hyperlinks (of both internal links and external URLs), etc., so normally there isn’t a lot more that needs to be done at this stage.
10. Update RankIQ’s content planner (under the reports tab), where I keep track of each post’s status.
While this may seem like a lot, believe me, it’s not!
RankIQ will help you tweak your content and make significant improvements within a matter of minutes.
This will improve your Google rankings and put your content in front of your target audience faster than ever.
Investing in RankIQ: is it worth it?
RankIQ was honestly one of the best investments I’ve made in 2023. I think it can benefit any content creator, blogger, or digital business owner!
And I am certain that, if you use it correctly and regularly, you’ll see results in no time.
Take a moment to read my full RankIQ review, where I share a huge win I got after using RankIQ on this blog, less than a couple of weeks after launching!
Conclusion
In my opinion, Brandon Gaille (founder of RankIQ, top blogger, and host of the Blogging Millionaire Podcast) has achieved something extraordinary with this tool.
There is nothing quite like RankIQ out there!
This is a fantastic resource that all bloggers and online business owners should try! I am confident that it will help you create high-quality content that can easily reach a 1st page Google ranking.
So, what are you waiting for? Will you give RankIQ a try?
I’d love to know how it helps you. Let me know in the comments! 🙂
Click here to head to RankIQ and enjoy the discounted rate of only $49 per month (this offer is valid for a limited time).