

How to Create a Gravatar (and why it’s important!)


As a new blogger, it’s easy to skip over minor details like creating a Gravatar. Perhaps you haven’t even come across the term before, and you have no idea what I’m referring to.
But I believe even the tiniest details can make a huge difference in how you come across online. Setting up a Gravatar is easy and fast. And it can make a difference in how your brand is perceived, too.
That’s why I decided to cover the topic today! In this short post, we will discuss:
- What a Gravatar is;
- How to create a Gravatar for your blog; and
- Why it’s important.
What is a Gravatar?
Gravatar is a free service created by the developer Tom Preston-Werner and later acquired by Automattic – the creators of WordPress.com, Jetpack, and more.
Your Gravatar profile is connected with your email address, and it’s been described as a “digital passport”. Essentially, it becomes your online identity! It follows you around the Internet when you do things like creating an account on certain websites or commenting on blog posts.
Here’s how the company lays it out:
An “avatar” is an image that represents you online—a little picture that appears next to your name when you interact with websites.
A Gravatar is a Globally Recognized Avatar. You upload an image and create your public profile just once, and then when you participate in any Gravatar-enabled site, your Gravatar image and public profile will automatically follow you there.
For example, once your Gravatar account has been set up then your image will automatically appear on OpenAI, Slack, WordPress etc.
Gravatar.com
How to create a Gravatar for your WordPress blog?
Creating a profile with Gravatar for your WordPress site couldn’t be easier. In fact, it’s possible that you already have an account, and all that’s left to do is fill it out with your information.
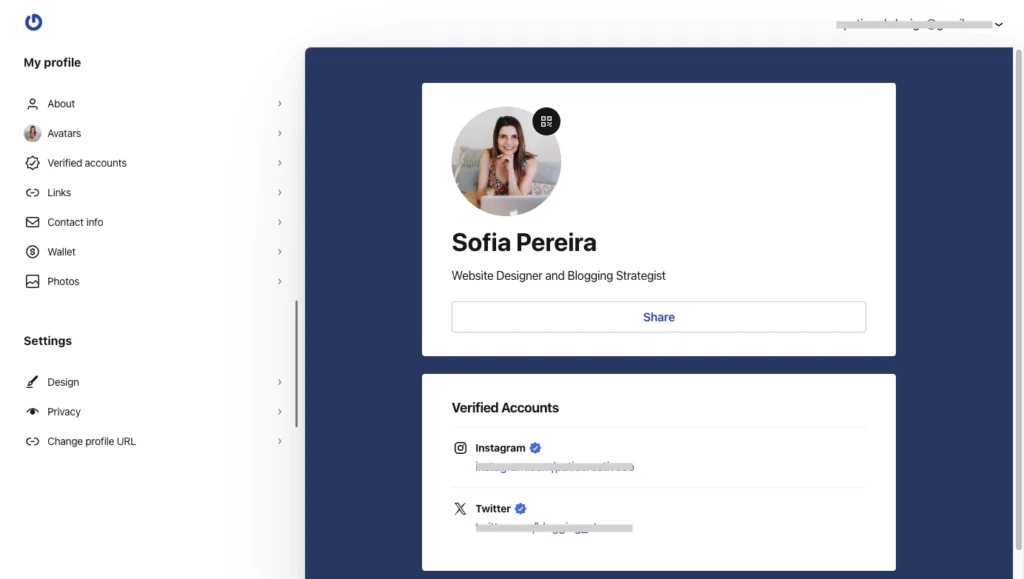
Here’s a quick setup guide on how to create a Gravatar in less than 5 minutes:
1. To start a new account, head over to the Gravatar website at gravatar.com and click the blue “Sign Up” button in the top-right corner of the screen
2. Sign up for a free account by entering your email address and following the setup process, or log in with your existing WordPress.com credentials.
For example, if you have a wordpress.com account or use the Jetpack plugin, you’ll want to use the same information you used when setting those up. That means an account has already been created.
3. Fill in your personal details.
As usual, choose a strong password for your account. You can also decide on the username you’d like to use, which will be part of your unique Gravatar URL.
4. Once that’s done, you’ll receive a confirmation email from wordpress.com.
5. Head back to gravatar.com and log in.
6. Fill in your “About” section with your display name, a short bio, and more.
7. Click on “Avatars” and upload your profile image.
I encourage you to select a high-quality image of yourself or your company’s logo.
Click on “Upload Image” and then choose a file from your device. Ideally, it should be a square image, but Gravatar will prompt you to crop it directly from the app.
8. From within the same tab, you can connect multiple email addresses to your Gravatar account.
9. If you have multiple email addresses, assign that picture (or upload more) to each of those emails.
10. Connect your social media accounts from the “Verified accounts” tab.
This will be a simple two-click process if you are already logged in to social media on the same browser.
11. Add your URLs. Click “Links”.
Here, you can add links to your different platforms, including various websites, blogs, or any other URLs that you use.
That’s all. As you see, it really does take less than 5 minutes and only a few simple steps!
You’ll find that there are other options that you could tweak if you want to. For example:
- Adding a “Contact info” section to your Gravatar profile (the contact information section includes phone numbers, emails, a contact form, or a calendar);
- Adding a “Wallet” (connects with PayPal, Patreon, Vemno, and more);
- Adding more photos to show up on your profile;
- Changing the look and feel of your profile page with a custom background color or image;
- Changing the privacy settings of your page to let Gravatar know whether it can be made public; and
- Changing the slug of your profile to customize the URL.
Why should you have a Gravatar?
Creating a Gravatar is free and effortless. I honestly don’t see why anyone would decide not to have one.
Especially as a blogger or online entrepreneur, something as simple as having a globally recognized avatar can have a big impact on your branding.
Pin this for later 🙂


Increase brand awareness
Creating a Gravatar can help make your brand recognizable and build trust.
We are naturally drawn to visual stimulation! A commenter who has uploaded their profile picture to Gravatar will instantly look more legitimate than one that shows the gray “Mystery Person” icon, which is the default for users who haven’t created a Gravatar.
If you are a blogger or building a personal brand, I recommend that you use your own profile photo. People connect with people!
If you’re a company, then your company’s logo is likely to work best.
Most people choose their avatars based on what they already use across platforms. It’s a good idea to keep it on-brand and consistent.
Whatever profile picture you’ve used for Instagram, Facebook, Twitter, etc, is probably what you’d want to set as a Gravatar, too.
Connect with others
Establishing yourself in your niche and making your brand known will also help you build relationships with other bloggers.
If you have a unique avatar and comment on people’s blogs often, they will naturally start to recognize you. They may even think of you when opportunities come up!
On the contrary, the “Mystery Person” icon will make it nearly impossible to establish credibility, look professional, and stand out.
For most people, it’s easier to remember an image than a name!
Earn an easy backlink
You can link to all of your sites and social media pages from your Gravatar user profile!
While these links are set to nofollow, getting your blog linked in as many trustworthy places is always beneficial!
Allowing your Gravatar site to be publicly available and indexed by search engines can also bring some traffic to your site and social media accounts.
Customize your author box
Some themes will automatically pull your picture from Gravatar and include it on your own blog’s author box.
When that’s the case, it’s often the only way to show your face next to your author bio at the end of a blog post.
This is an important one to have because it shows your authority in the niche you blog about and, once again, builds trust and credibility.
What to do if you have accidentally created multiple Gravatar accounts?
If you have created multiple Gravatar accounts for each one of your email addresses, or tied to different websites, there’s an easy way to merge them.
I decided to cover this topic because it happened to me recently, and it could happen to you, too. There’s no need to worry!
If you want all of your Gravatars to be inside the same login account, all you have to do is delete the unnecessary accounts.
To do that, go to WordPress.com and log in with your Gravatar credentials using the account you created mistakenly.
Click “Account Settings” in the sidebar menu, scroll down, and hit “Close your account permanently” at the bottom of the screen.

The process will take 30 days to complete, but once that time has passed, you can log in to the account you want to keep using and add the same email address there. To do that, visit Gravatar.com and log in with your main account’s credentials after 30 days have passed. Then click on “Avatars” and hit the “Add email” button.
Now, all of your email accounts and various websites will be under the same Gravatar account for easy management!
Over to You
Creating a Gravatar is easy, quick, free, and requires little to no maintenance. Besides, as you’ve seen, it comes with some extra perks!
Will you take a few minutes to create yours right now? Let me know in the comments!
Read next:


I never heard of a Gravatar! – interesting 🙂