WordPress Discussion Settings: How to Manage Blog Comments


Allowing comments on your blog creates a welcoming and engaging space for your readers. The comments section encourages users to leave feedback on each of your posts, ask questions and connect with you.
For you as a blogger, it’s also a great tool to gain valuable insights on what your audience might be looking for, and an excellent idea generator for new topics to cover on the blog.
But you might have noticed that the WordPress discussion settings and its commenting system by default are somewhat limited.
In today’s post, we’re going to take a closer look at several aspects that can enhance both your readers’ experience and your workflow when it comes to comment management activities.
Here’s what we’ll cover:
- WordPress Discussing Setting: which boxes to tick and what they actually mean;
- How to add important features to boost user experience and compliance;
- How to prevent spam comments, keep comments in the moderation queue, and add a comment blacklist;
- How to manage comments on individual articles; and
- Other frequently asked questions.
What are WordPress comments?
WordPress comments are user-generated responses, reactions, or feedback, left by your blog’s readers on individual posts. They give your readers the possibility to interact with you and engage with your content.
User comments typically include thoughts, questions, opinions, or additional insight about the topics you’ve mentioned in the blog post.
You can auto-approve comments or set them to be manually published so that you never miss an interaction.
You can also reply to each comment directly from your website’s backend.
Essentially, the WordPress comments section creates a sense of community, which can lead to a better user experience.
Besides this important human element, search engines will often consider user engagement as a factor in determining the relevance and credibility of a page. A blog post with insightful comments may be perceived as more valuable.
Should you activate comments on your blog?
Deciding whether to allow user-generated content on your blog is a personal choice.
Most bloggers love to see their readers’ feedback and interact with them in the comments section. Others, however, have decided to turn off comments completely.
Today, there are plenty of online communities for content creators in all niches.
You could even run your own Facebook group instead, or manage an active social media account on a different platform. If that’s the case, you may not find value in allowing comments on your WordPress blog posts.
If you’re trying to decide whether or not to activate the comment section on your blog, read this article next. I have laid out the benefits and pitfalls to consider.
Pin this for later 🙂

WordPress Discussion Settings Tutorial for Beginners
Let’s head over to the WordPress discussion settings screen and review the available options. From your site’s dashboard, hover over “Settings” and then click on “Discussion”.
Default post settings

“Attempt to notify any blogs linked to from the post”
When you tick this box, WordPress will attempt to notify other WordPress website owners when you have linked to them in your articles. The notification will appear in their comment section if they allow pingbacks.
Enabling this option can slow down your website slightly. That’s because WordPress will be working in the background to send out notifications to third-party sites, about any hyperlinks you’ve included in your blog post.
“Allow link notifications from other blogs (pingbacks and trackbacks) on new posts”
This option is essentially the same as the above but in reverse.
When you tick this box, you’re asking WordPress to notify you of any references other site owners make of your own.
“Trackbacks and pingbacks are methods for alerting blogs that you have linked to them. The difference between them is:
Check out this article by WordPress for more details.
- Trackbacks – must be created manually, and send an excerpt of the content.
- Pingbacks – are automated and don’t send any content.“
I personally leave both options disabled.
This is an old-school way of communicating with other bloggers. When relevant, I prefer to personally get in touch with the bloggers I have decided to mention within my content.
I have received similar emails from others, too, which tells me not many people rely on these settings.
“Allow people to submit comments on new posts”
This is straightforward: this specific checkbox defines whether you want to allow comments on your blog posts.
If you do not wish to accept user-generated content, all you have to do is uncheck this option.
Quick note:
Any changes made to the settings mentioned above will only apply to the new content you publish moving forward.
In this section of the WordPress dashboard, you’ll be deciding on what should happen by default. However, within the individual post editor, you can modify your choices on an individual post basis as well.
Other comment settings
This area of the Discussion Settings panel is totally up to preference. There is no right or wrong way to handle it.
Since each option is pretty self-explanatory, I will simply share my personal choices below.
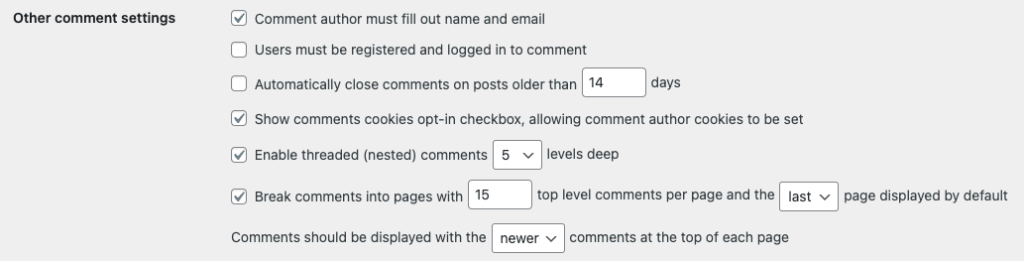
“Comment author must fill out name and email”
I have checked this box, as it will add an extra layer of security to my site and help avoid spam to a certain degree. I also like to know who is commenting on my posts.
At the end of the day, anonymous comments will not provide you with any information on your reader’s profile, and unless the comment’s content is rich, it will not add much value to the conversation.
“Users must be registered and logged in to comment”
I have left this unchecked, as to me, it makes more sense to use this feature on forum sites or membership sites. While it is an effective way of preventing spam, most users might not want to comment at all when they come across a site registration requirement.
I still want to hear from them if that’s the case!
“Automatically close comments on posts older than [X] days”
I have left this one unchecked for now.
If you find that you get A LOT of spam and can’t find a way around it, this may be an option to consider.
It essentially means that comments will be turned off a certain number of days after posts are published.
It might be a relevant setting to apply on an individual post basis if you are creating time-sensitive or seasonal content.
“Show comments cookies opt-in checkbox, allowing comment author cookies to be set”
This allows users to save their name and email address to be automatically populated the next time they comment on your website.
I have kept this on! Unless you clear your browser cookies, your details will be auto-populated, saving you a few seconds.
When this is active, a new (optional) checkbox will appear under the comment field. It reads, “Save my name, email, and website in this browser for the next time I comment.”
“Enable threaded (nested) comments [X] levels deep”
I have chosen comments to go 5 levels deep. You can go up to 10 levels.
“Break comments into pages with [X] top level comments per page and the [last/first] page displayed by default” and “Comments should be displayed with the [older/newer] comments at the top of each page”
I break comments into pages of 15, starting with the last comments at the top.
Limiting the number of comments per page can help boost your page’s load speed.
Additionally, setting the newer content to be on top is the most common approach in this type of situation. That’s what makes sense for me, at least.
If you’re reading a blog post that was originally published in 2015, but the latest comment is from last week, you will feel that it’s still relevant.
On the other hand, if you don’t see any interactions or updates since 2015, you’ll likely head back to Google and look for fresher results. Am I right?
Email me whenever
“Anyone posts a comment” and “A comment is held for moderation”
I keep both of these on so that I can be on top of any incoming comments and reply to my readers as soon as possible.
Before a comment appears

“Comment must be manually approved”
This option prevents WordPress from automatically publishing incoming blog comments, whether the reader has commented on the blog before or not.
“Comment author must have a previously approved comment”
With this option activated, you will only have to moderate a reader’s first comment. Moving forward, any new comments made by the same user will be automatically approved.
Comment Moderation
“Hold a comment in the queue if it contains [X] or more links. (A common characteristic of comment spam is a large number of hyperlinks.)”
Under comment moderation, you can override the default settings by defining certain comments to always be held for manual approval.
You can decide to hold on comments that include a certain number of links, or list words, authors, URLs, IPs and more.
Disallowed Comment Keys
Similarly to the above, you can “block” comments that contain certain words or specify IP addresses that won’t be able to leave comments on your blog.
When comments match the criteria you’ve set in this section, they will go straight to the trash.
Avatars
An avatar (or Gravatar – short for Globally Recognized Avatar) is an image that follows you around the internet and appears next to your name when you interact with participating sites.
In this post, I explain how you can set one up for yourself.
In this section of your Discussion Settings, you can decide whether your comments’ element will display the commenter’s avatar and exactly how those should appear.
For example, you can enable a default avatar image when a user has yet to create a Gravatar account.
Once you’ve chosen and tweaked all your discussion settings to your liking, don’t forget to click “Save Changes”!
How to Set up and Manage Comments: Frequently Asked Questions
We have covered all the basic discussion settings that are natively built into the WordPress core functionality.
Now, we’re going to take a closer look at some of the most commonly asked questions about WordPress comments and also go over a few extra features you might like to consider.
How do you disable comments on WordPress?
To disable the comments section of your posts for your entire WordPress site, simply head to “Settings” and click the sub-tab “Discussion”. Check off the box that reads “Allow people to submit comments on new posts”.
This will be applied site-wide, only to new articles.
How to disable comments on a specific post?
To turn off comments for a specific article, head to “Posts” > “All Posts”. Find the old posts you want to disable comments for, select them, and click “Quick Edit”.
You’ll see a checkbox that says, “Allow Comments”, which you can check or uncheck per your needs.
Alternatively, as you are writing a new blog post inside the WordPress Gutenberg editor, look for the discussion module on the right-hand pane. It will be under your feature image and excerpt tabs. Check and uncheck the “Allow comments” option as you wish.
If you don’t see that, you may have to enable it to be displayed. Click the three vertical dots in the top-right corner of the screen and then click “Preferences”.
Finally, move down to the “Panels” tab and toggle “Discussion” on.
How to get rid of spammers on WordPress?
I have written a full blog post on how to avoid getting spam comments on your blog.
These were my top tips for different options you can consider:
- Turn off comments completely (we’ve covered this above);
- Remove the website field (learn about two different methods to achieve that here);
- Install an anti-spam plugin to help you deal with the task (such as Akismet, CleanTalk or Antispam Bee); or
- Review your discussion settings, as covered in this post.
Moderating every comment manually as they come in, will certainly help you avoid spam from getting published on your blog.
How to show my picture when I leave a comment on other blogs?
When you leave comments on other blogs or reply to your blog’s readers on your own, the image that sometimes displays next to your name is called “Gravatar”.
If you haven’t set one yet, I encourage you to do it right now. It’s easy and fast!
Follow this short tutorial to learn how to create one in under 5 minutes.
How to add a Privacy Policy checkbox to WordPress comments?
Adding a Privacy Policy checkbox to your WordPress comments section may be required for you to comply with GDPR. This isn’t legal advice; if you want to be sure, consult a legal advisor.
But I did want to share that the free plugin I use to accomplish this is WP Comment Policy Checkbox, by Fco. J. Godoy.
Unfortunately, as of writing this post, it hasn’t been updated in 12 months. But it still works correctly, and it’s active on 7,000 websites! If anything changes and the plugin is abandoned, I will look for an alternative and keep you updated on a different option.

How will my blog readers know when they get their comments answered?
Unfortunately, your blog’s readers won’t be notified when you reply to their comments.
If you aren’t familiar with how the WordPress commenting system works, this may come as a surprise. I was quite shocked when I realized it myself!
Unless those visitors return to your post and check, they’ll never know you have replied to them.
What a bummer, right?
Well, if that’s something you’d like to change like I did, this short tutorial will show you my simple workaround for sending an email notification to my audience as soon as I reply to their comments. I had to have it, so I went looking for the perfect solution for this issue!
Conclusion
As you see, while allowing comments on your blog is easy, you can enhance WordPress’s native capabilities in many ways. These will improve your life as a moderator and boost your site’s user experience.
If you are still deciding whether to allow comments, be sure to read The Pros and Cons of WordPress Comments next.
Also, tell me your thoughts on comments. Scroll down to my comments section below and share your thoughts. Honestly, I’d love to know!
Related posts:
• How to Create a Gravatar
• How to Avoid Spam Comments on WordPress
• Should you enable comments on blog posts?